Requirements
Microsoft lists requirements plainly if folks are looking, but if you have a relatively modern system and up-to-date hardware there are only a handful of criteria that end up being hangups for you:
- UEFI (Unified Extensible Firmware Interface) Secure Boot [BIOS option]
- TPM (Trusted Platform Module) 2.0 [also a BIOS option if your motherboard supports it]
For UEFI to work properly in Windows, you're going to need your system disk to be set up with GPT rather than MBR, and you're going to need that pesky recovery partition you may or may not have configured correctly anymore. In my case, my system disk had been carried over from the Windows 7 days. It was still MBR and I had the recovery partition (with nothing on it) but little seemed to be able to see it.
MBR to GPT and Enabling UEFS, etc.
If, like me, you're stuck with a Windows boot disk that's in MBR (Master Boot Record) configuration, you'll need to first confirm that you are able to switch to UEFI boot mode in your BIOS (don't do it yet - you'll need to do it right after converting to GPT/UEFI).
MBR2GPT Utility
Windows ships with a utility called MBR2GPT that can be run either from the recovery console or from an administrator command prompt within Windows 10. I followed this guide to converting to GPT: https://www.windowscentral.com/how-convert-mbr-disk-gpt-move-bios-uefi-windows-10. I ran the command from within a running Windows 10 instance (because I like to live dangerously). This involved two commands:
MBR2GPT /validate /allowFullOSMBR2GPT /convert /allowFullOSI did, however experience a problem toward the end of the conversion:
MBR2GPT: Conversion completed successfullyCall WinReReapir to repair WinREMBR2GPT: Failed to update ReAgent.xml, please try to manually disable and enable WinRE.In spite of an overall successful result, I was worried that left unrepaired this might leave my system unbootable/unrecoverable.
Fixing ReAgent/WinRE
I found a forum post from 2019 detailing the problem and 3 pages in I found the instructions I needed to get through it. In short, I needed to find my recovery partition and assign it a letter, then tell ReAgent where to find it.
I first opened up Disk Management and checked for the disk # and partition # of my recovery partition. I then ran the DISKPART command from an administrator command prompt to be able to map a letter to the disk (Disk Management doesn't seem to allow it in this case). If your recovery partition already has a letter assigned, you can skip this step:
DISKPART> select disk 0

Disk 0 is now the selected disk.

DISKPART> select partition 4

Partition 4 is now the selected partition.

DISKPART> assign letter = H

DiskPart successfully assigned the drive letter or mount point.

DISKPART> exitYou should then be able to run:
reagentc /setreimage /path H:\Recovery\WindowsREAfterward, I was able to use reagentc with the /enable command to prove to myself the problem had been fixed.
I then rebooted and switched the bios setting to UEFI for disks (in my BIOS this took the form of disabling legacy boot modes). While there, I located both the Secure Boot and TPM (Trusted Platform Module) 2.0 settings and enabled them. Rebooting again, I was returned to Windows 10. Whew.
Installing Windows 11
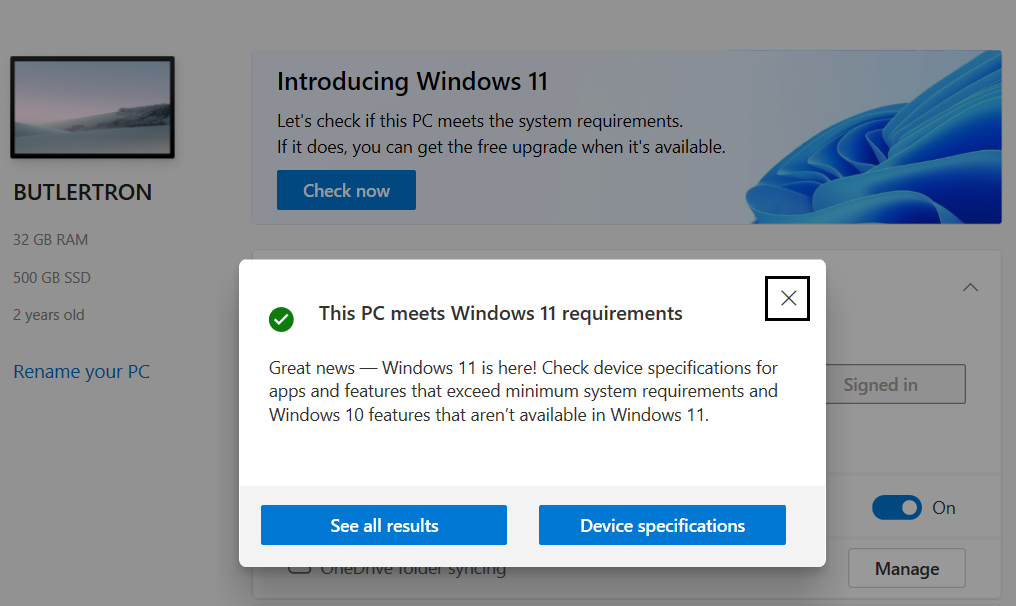
From within Windows 10, the Windows Update screen was still giving me a warning that my system did not qualify for Windows 11. I had previously downloaded the PC Health Check app, however, and it informed me otherwise.
I downloaded the Windows 11 Installation Assistant and gave it a run, but it failed at 71%. I tried again and it again failed at 71%. Whoops, I didn't try running it as administrator. Once I did, the process continued (for a long time) seamlessly.
I did have one hiccup after it rebooted and took me to an old GRUB prompt from a past Linux install on another of my drives, but returning to my BIOS settings and disabling that boot disk solved the issue for me.